How to Use a DVT Pump: A Step-by-Step Setup and Usage Guide
How to Use a DVT Pump: A Step-by-Step Setup and Usage Guide
If your doctor has recommended a DVT pump (intermittent pneumatic compression device) for home use whether recovering from surgery, managing limited mobility, or reducing clot risk knowing how to set it up and use it correctly makes a big difference in comfort and effectiveness. Here's a complete walkthrough of getting started.
Always follow the specific instructions provided by your doctor or the device manufacturer, as settings and setup can vary between models. This guide is for general educational purposes only.
What's in the Box
Most home DVT pump systems include:
- A pump unit (the motor that generates air pressure)
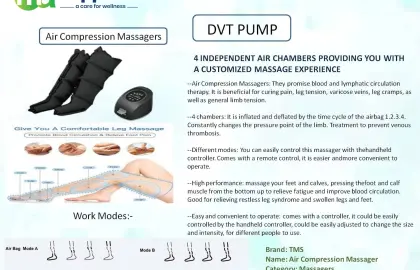
- Compression sleeves or wraps (calf, thigh, or foot styles depending on the device)
- Connective air tubing
- A power cord or battery pack, depending on the model
- An instruction manual specific to your device
Before first use, check that all pieces are present and undamaged, and read through the manufacturer's manual for any model-specific steps.
Step 1: Choose a Comfortable, Accessible Setup Location
Set up the pump somewhere you'll be resting for an extended period a bed, recliner, or couch. Make sure:
- The pump unit is placed on a stable, flat surface (nightstand, floor, or bedside table)
- The power cord (if applicable) can reach a nearby outlet without creating a tripping hazard
- Tubing has enough slack to reach comfortably from the pump to your legs without pulling
Step 2: Position the Compression Sleeves
Wrap the compression sleeves around your legs as directed:
- Calf sleeves wrap around the lower leg, typically starting just above the ankle.
- Thigh sleeves extend further up, covering both calf and thigh.
- Foot sleeves wrap around the foot itself, for patients who need a lighter or more targeted option.
Make sure the sleeve fits snugly but not overly tight you should be able to comfortably slide a finger or two underneath the fabric. A sleeve that's too loose won't compress effectively; one that's too tight can cause discomfort or restrict circulation.
Step 3: Connect the Tubing
Attach the air tubing from each sleeve to the corresponding port on the pump unit. Most devices color-code or label the connections (e.g., left leg vs. right leg) to avoid confusion. Double-check connections are secure loose tubing is one of the most common reasons a pump won't inflate properly.
Step 4: Power On and Select Settings
Turn on the pump unit. Depending on your model, you may need to select:
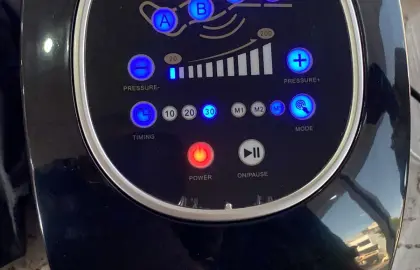
- Compression pressure level usually adjustable, and should be set according to your doctor's recommendation.
- Cycle timing how long each inflate/deflate cycle lasts, typically pre-set but sometimes adjustable.
- Duration or continuous mode some devices run for set time periods, while others are designed for continuous use, such as overnight.
If you're unsure what settings to use, contact your healthcare provider or refer to your discharge instructions, especially if the device was prescribed during a hospital stay.
Step 5: Confirm Proper Inflation
Once started, you should feel a gentle, rhythmic squeezing sensation moving through the sleeve, typically starting at the ankle and moving upward. This should feel firm but never painful. If you notice:
- No inflation at all check tubing connections and power
- Uneven inflation between legs check for tubing kinks or loose connections
- Pain or excessive tightness stop the device and loosen the sleeve, or contact your provider if pain persists
Step 6: Stay Comfortable During Use
While the pump is running, you can typically rest, read, watch TV, or sleep, depending on your device and prescribed usage schedule. Some tips for comfort:
- Keep the tubing untangled and away from areas where you might roll over or catch it
- Use a light blanket if needed, but avoid anything that traps excessive heat under the sleeves
- If using overnight, make sure the pump unit is within reach in case you need to pause or adjust it
Step 7: Turn Off and Remove Properly
When your session is complete (or as directed by your provider), turn off the pump before removing the sleeves. Unfasten the sleeves gently, and disconnect the tubing from the pump unit. Store components together to avoid misplacing tubing or sleeves between uses.
Step 8: Clean and Maintain the Device
- Wipe down the sleeves with a damp cloth or manufacturer-approved cleaning solution after use, especially if used daily.
- Avoid submerging the pump unit or tubing in water.
- Check tubing periodically for cracks, kinks, or wear, and replace components as recommended by the manufacturer.
- Store the device in a clean, dry place when not in use.
Tips for Getting the Most Out of Your DVT Pump
- Stick to your prescribed schedule. Consistency matters more than intensity regular use as directed is more effective than occasional, extended sessions.
- Combine with movement when possible. If your doctor has cleared light mobility, gentle movement alongside pump use can further support circulation.
- Keep skin clean and dry under the sleeves to reduce irritation with regular use.
- Monitor your legs for any unusual swelling, redness, warmth, or pain, and report these to your healthcare provider promptly, as they could indicate a clot or other issue requiring attention.
When to Contact Your Healthcare Provider
Reach out to your doctor if you experience:
- Persistent pain, numbness, or tingling during or after use
- Skin irritation, redness, or breakdown under the sleeves
- Signs of a possible blood clot, such as sudden swelling, warmth, redness, or pain in one leg
- Device malfunction that isn't resolved by checking connections and power
Final Thoughts
A DVT pump is a simple but effective tool when set up and used correctly. Taking a few extra minutes to ensure proper sleeve fit, secure tubing connections, and the right pressure settings can make a meaningful difference in both comfort and effectiveness. As always, follow your healthcare provider's specific instructions, and don't hesitate to reach out with questions as you get used to your device.
DVT Pumps
-53%
Latest Posts